Making Raspberry Pi program by cross-compiling C++ with Eclipse on CentOS
On the post written in the end of June, “A total beginner started to learn electronics with Raspberry Pi”, I wrote a shell script to turn on an LED ramp. Shell scripting is easy to start, but I thought using C language might increase possibility. I finally made a developing environment for stress-free programming.
First of all, I followed a sample program in elinux.org written in C.
The program was not useful so much because I have to memorize commands. For example, the sample program calls
setup_io();
to setup GPIO, which means I have to memorize the command “setup_io()”. This is because C language is Procedural.
It seems C is used in the world of electronics. There are many people who use IC chips called PIC to control circuits, and C is used to write programs to PIC. PIC must be a de facto standard because it is sold since 1975 until now.
On the other hand, C++ language is objective. Roughly speaking, you don’t need to memorize commands like C. Take a look at my developing environment to understand.
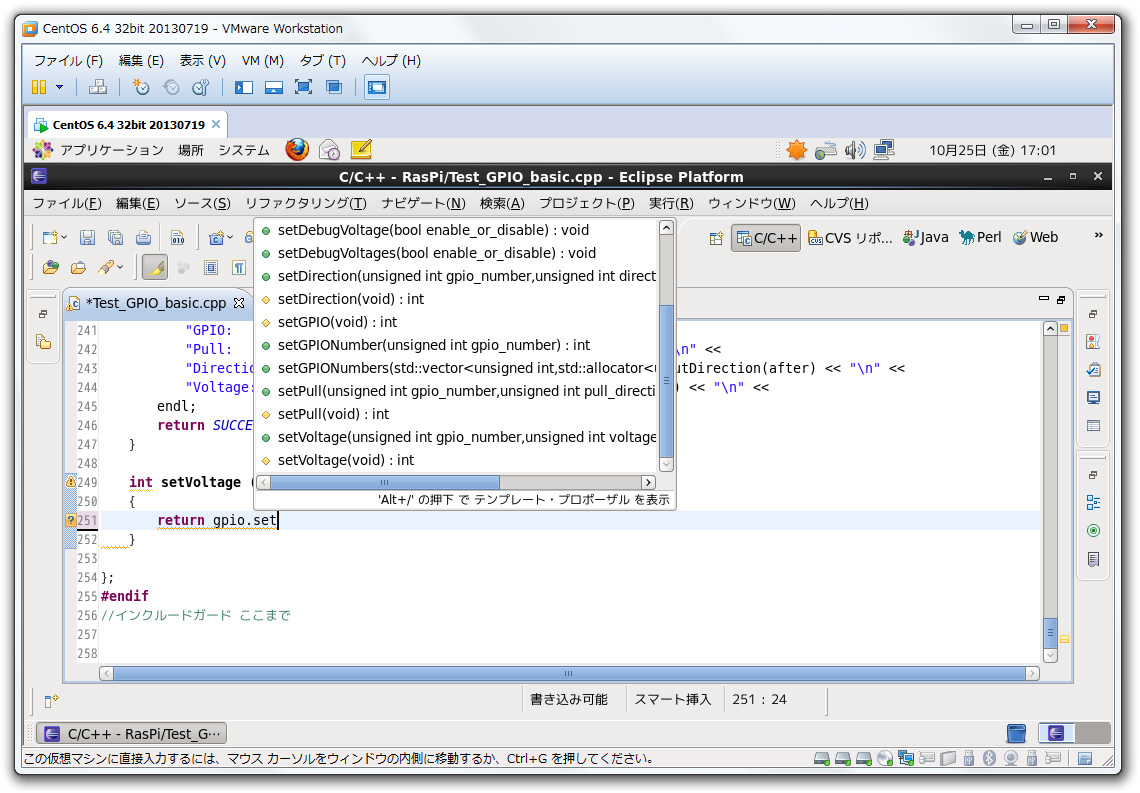
This is right after I typed “gpio.set”. See the list of commands starting with “set”. The list itself appears right after I typed “gpio.”, and I filtered by keeping typing “set”. This is why I say you don’t need to memorize commands. I hope you understand a characteristic of C++.
By the way, the list of commands appears because I use C++ AND the editor which has this function. If you want to develop like me, you need to construct your developing environment.
I need to say sorry first because making a developing environment is very difficult for especially beginners. It is impossible to explain or understand everything. The purpose is to introduce my environment. Please search or refer for detail.
The best way is to use Eclipise (See below) in RasPi’s GUI environment, but it seems impossible while RasPi doesn’t have enough CPU or memories. I haven’t tried though. So, I used my Windows PC and made a developing environment in it. My PC has an Intel Corei7-3770 which has 8 of 3.9GHz cores and 2 4GB DDR3-1600 (PC3-12800) memories. (Total of 8GB memories.)
My developing environment consists of an OS, a Virtual machine, an editor and a compiler.
OS
We often see Windows and MacOS, but I use Linux. Not like Windows or MacOS, Linux has great support for programming. There are some sorts called distribution, and my Linux is CentOS 6.4. You need to prepare a computer for using CentOS, but don’t rush into a computer store yet 😉 You can make a computer in your computer! This new computer is called a virtual machine, and the software to make virtual machines is VMware.
VMware
VMware allows you to create a virtual machine and install Oss like Windows, MacOS and Linux. The advantage is not only you don’t need a new computer. You can save your virtual machines anytime you want to. If your CentOS has a problem, you just need to open the virtual machine which you made first.
There are 2 versions of VMware for Windows users. Player is a stand-alone and free. Workstation is a pay but you can open multiple Oss at the same time and computers on the same network can access to those Oss. I use Workstation, but Player is enough for things on this post.
Mac users need Fusion and it is about $80.
Eclipse
Eclipse is an editor to make programs. Using Eclipse lets you program easier, in not only C, C++ but Java, Perl, Python, and much more. It was Eclipse’s function (and because C++ is objective) to have a list starting with “set” when I typed “gpio.set”. By the way, Eclipse is just an editor. You need a compiler to make executable programs.
Look at the image above carefully to see the relationship among OS, VMware and Eclipse.
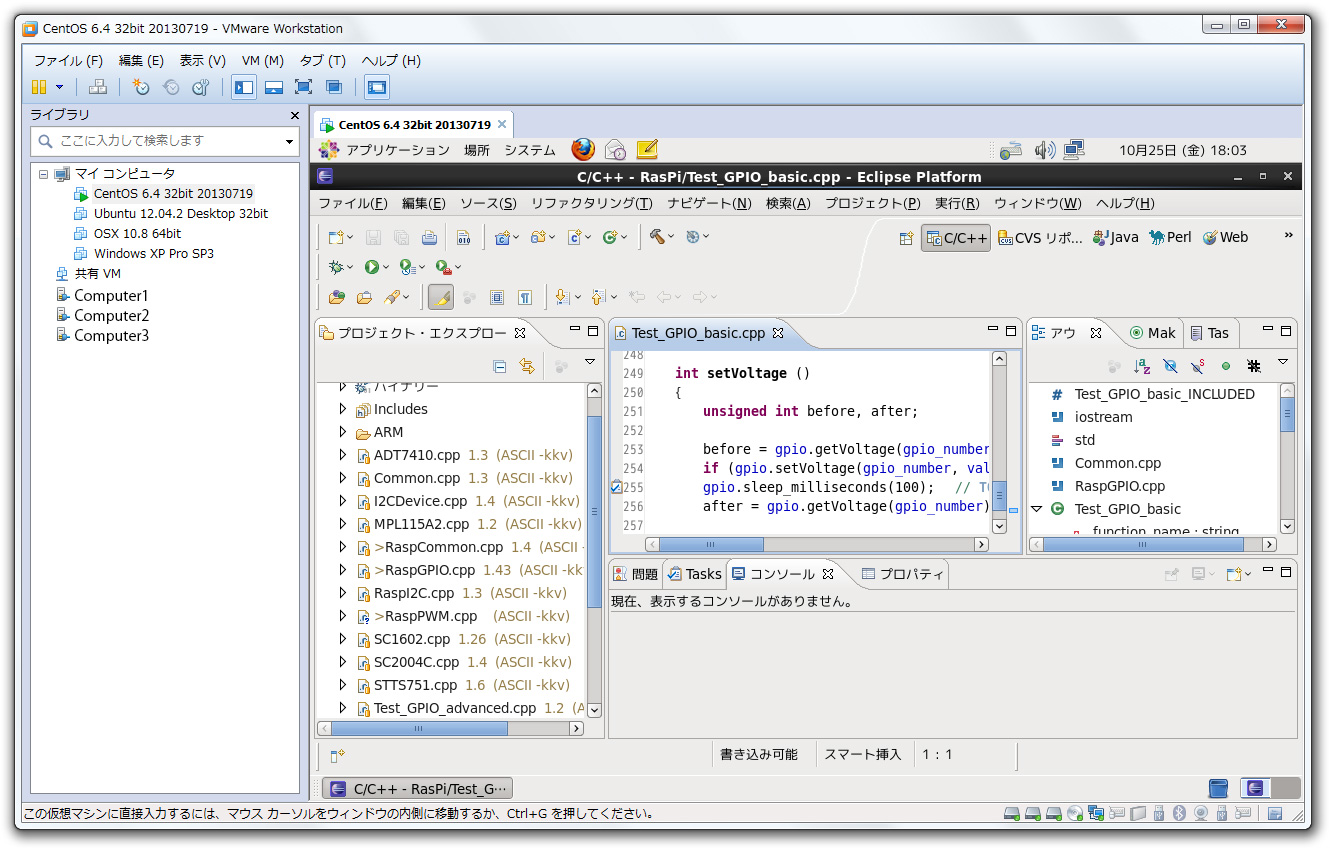
The outermost window is VMware. As its appearance of the window frame, VMware is just software operating under Windows7. You can find OSs installed on the left frame of VMware. OSs can be “played” by selecting them and click “play” button. And then Oss boot in the right frame. The image shows CentOS is now powered on. Eclipse is launched in CentOS and a file is being edited on Eclipse. Every element exists inside one another.
Compiler
Compiler is a program to convert program files into executable files. Once you can install Eclipse on CentOS, you can compile C or C++ program that run under CentOS. But this executable files can’t run under Raspberry Pi. (You could do this if you Eclipse could have run under Raspberry Pi.) So, When I just bought a Raspberry Pi, I used to program with Eclipse on CentOS first, and if I didn’t get any errors on compilation, I copied the program to Raspberry Pi, and compile again on Raspberry. More precisely, I made a share folder, not actually copying files. I think it took about 10 seconds to compile when my programs were small, but as they became larger, it took much time. This is why I needed a cross compiler.
Cross compiler
An executable file runs only under the same OS which the compiler runs under. This means programs compiled under CentOS runs only under CentOS, and programs compiled under Raspberry Pi runs only under Raspberry Pi. What if a compiler under CentOS makes an executable that runs under Raspberry Pi? Cross compiler does exactly this.
Unfortunately, there is no cross compiler listed on “Add/Delete software” function of CentOS. You have to compile a cross compiler, and crosstool-NG helps this. You would be wondering a compiler compiles another compiler. Yes, this sounds like chicken or the egg. 😉
crosstool-NG
crosstool-NG is a tool which helps compiling a cross compiler. crosstool-NG itself is not a cross compiler. You need first to run crosstool-NG to configure, and then let crosstool-NG to compile a cross compiler. It took about 15 minutes to compile.
Now is the time to reap. You can develop C++ under the environment I showed above, and the executable file compiled under CentOS runs as is under Raspberry Pi. This is not all. The compilation speed improves extraordinary.
Because I keep extending my program, now I need to compile 18 files to make one executable file. I compared how fast I compile. I compiled with
- the original compiler of Raspberry Pi under Raspberry Pi.
- the cross compiler under the environment I explained.

What a difference! It took just 2 seconds, which we hardly tell from this graph.
I mentioned first about PIC. I bought a PIC writer and chips to learn how to compile PIC. To operate a PIC, you need to follow the same steps written on this post: write a program, compile it, and write it to PIC. Software called MPLAB supports all these steps. This means MPLAB is an editor, a compiler and software that writes program to PIC.
Before Raspberry Pi was made, I guess developing with MPLAB is the common way. But do you know how long it takes from compiling to executing? Putting a PIC chip to a writer, compiling, pitting the chip back to the circuit and turning on take more than 2 seconds.
I’d like to say Raspberry Pi is a powerful tool for developing. You can first develop with Raspberry Pi until you are sure your program and circuit work, and then you port the program into PIC when you make the actual circuit.
By the way, there are some restrictions on PIC. As far as I check MPLAB, C++ programming is not available on PIC8, PIC12 and PIC16 chips, but it is available on PIC32 chips. I haven’t programmed in C++ with PICs yet.
For your information:
Map at least 2GB memories to your virtual machine when you “ct-ng build” or you will have this weird error.
Build failed in step 'Installing PPL for host'
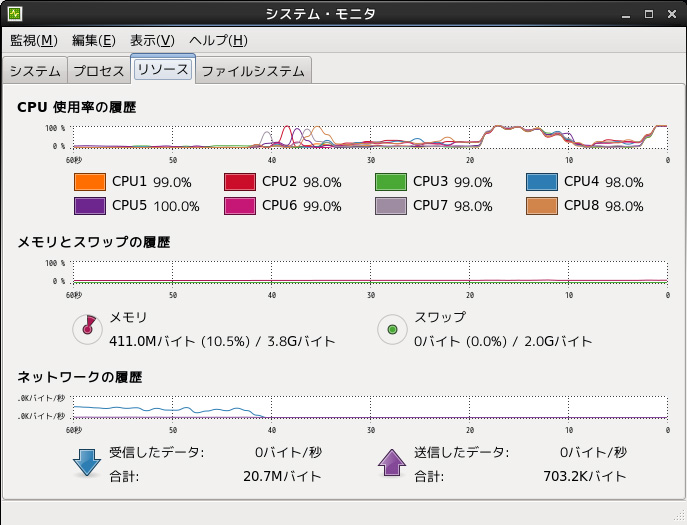
Make sure you map allCPU cores to your virtual machine. Even I did so, it took 15 minutes to “ct-ng build” with the CPU above. I mapped only 2 cores first and it took 28 minutes! The following graph shows how ct-ng use resource.
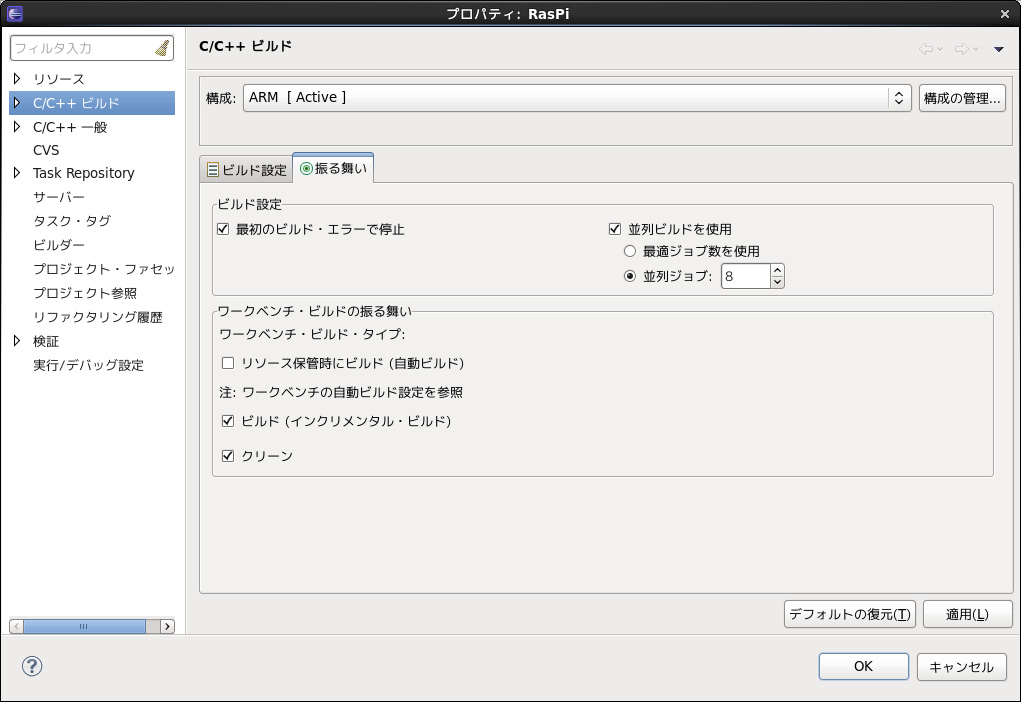
TO add a cross compiler on Eclipse, Add new config (ARM on the picture) and define a full path to the compiler.
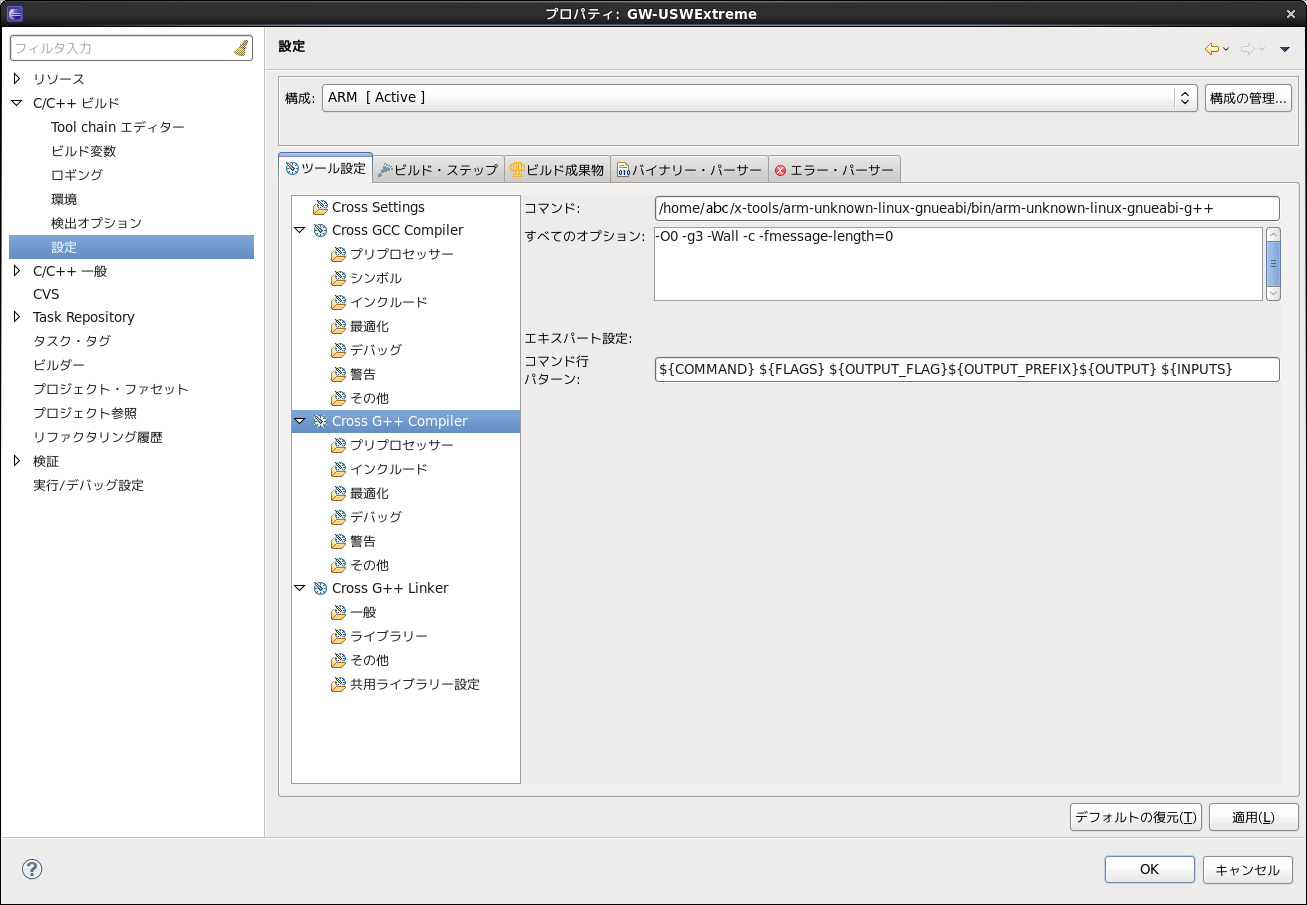
Check “Use Parallel build” and type numbers of CPU cores.
If you are interested in this post, check all posts about Raspberry Pi and Electronics DIY. For example, I posted these articles.
- A total beginner started to learn electronics with Raspberry Pi
A cigarette-box-size computer Raspberry Pi “bridged” between my knowledge of computer science and electronics. More precisely, RasPi made me one of zombies that crowd around circuit boards and connectors. LOL
- Electronics with Raspberry Pi Vol. 2
I couldn’t understand what current, resistance and voltage meant, but having spent money (aka investment 😉 ), I’m getting to understand what they mean.
- Tools I bought besides Raspberry Pi
4 months have passed since I got a RasPi and started to learn electronics. As I study, I needed to buy many things including books, electronic parts and tools. Today I show you what tools I’ve bought besides RasPi.
This post is also available in: Japanese
Leave a Reply